Skylight Flashing on a Metal Roof: Standing Seam Details

How to flash a skylight in a standing seam metal roof: curb height, crickets, seam clearance, panel sequence and expansion details contractors need to get right.
A skylight in a standing seam roof stays dry when it sits on a raised curb and the flashing is built to shed water around it. The curb, the panel terminations and the flashing layers do the work. The skylight unit does not. Seams that crowd the curb, a missing cricket, or a back-lapped joint cause most leaks, and each one is a layout or sequencing problem you can solve before the first panel goes down.
This guide is for roofing contractors and builders who install or coordinate skylights in standing seam roofs. It covers curb choice, curb height, seam clearance, crickets, sequencing, movement and what to confirm before you order panels.
TL;DR
- Curb-mount every skylight in a metal roof. Flush mounting leaves too little flashing height and is rated poorly by inspectors.
- Plan the skylight around the panel seams, not the other way round. Keep a clear water path beside the curb, or extend the flashing to the next seam.
- Add a cricket above wide skylights, generally those over 30 inches.
- Build the laps like shingles: water must always flow over the top of the next piece, never into a back-lap.
- Order the curb flashing, panels and trim together, cut to the actual layout, so the details fit the first time.
Table of Contents
- Why curb mounting is the starting point
- Lay out the skylight around the seams
- When you need a cricket
- The flashing layers, from the deck up
- Shed water, but let the panels move
- Check these before you order
- Fabricated flashing beats field bending
- Perspective: how we approach skylights on standing seam jobs
- Order the panels and flashing together
- A quick install checklist
- FAQ
- Sources
Why curb mounting is the starting point
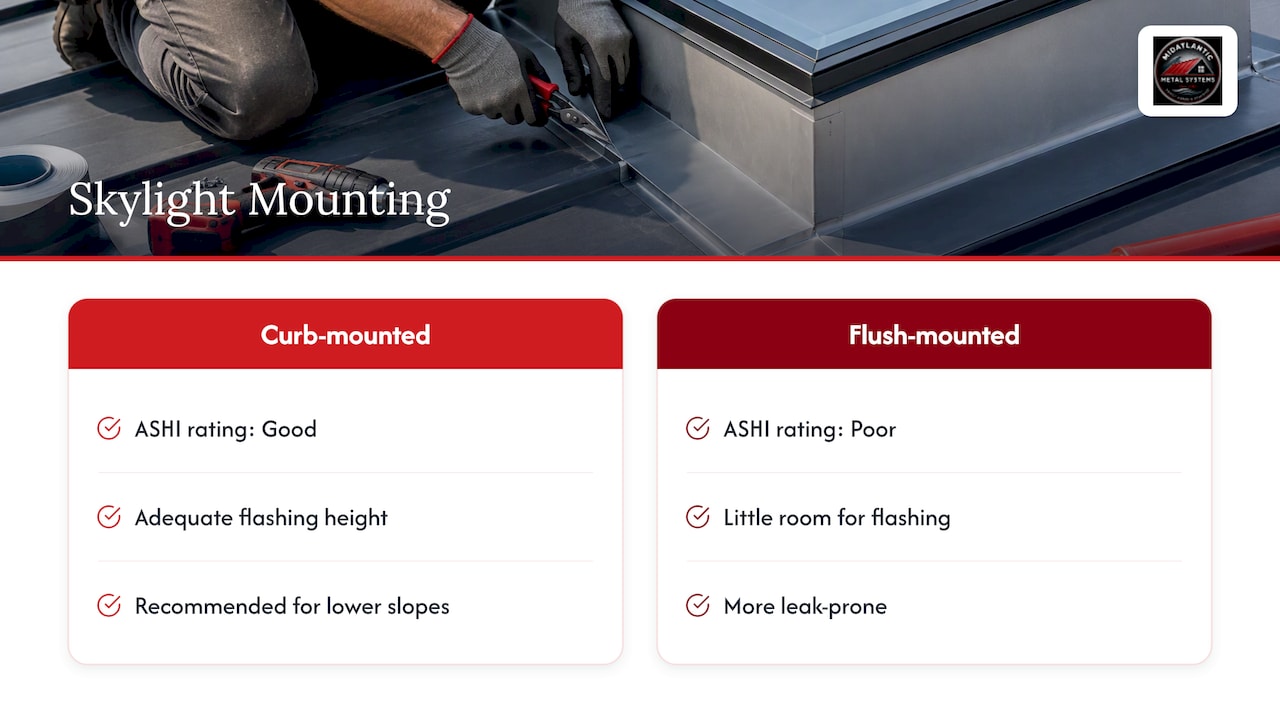
Metal roofing sheds water fast and has raised seams, so the flashing at a penetration needs real height on all four sides. A flush-mounted skylight sits almost level with the roof surface, leaving little room to turn flashing up and over.
The American Society of Home Inspectors ranks curb-mounted skylights as “Good” and flush-mounted skylights as “Poor”, and treats flush units as more leak-prone. Metal Construction News reports that an IMETCO specialist recommends curb-mounted skylights because the curb gives adequate flashing height, particularly on lower-slope roofs.
For a contractor, that translates into a simple rule. If the owner or designer specifies a flush-mount unit for a standing seam roof, raise it before the order is placed, not after the first leak call.
How tall should the curb be?
The same ASHI guidance recommends curbs at least 4 inches high on sloped roofs and 8 inches on flat roofs. Treat those as minimums for inspection purposes. The skylight manufacturer’s installation instructions may require more, and the manufacturer’s instructions govern the unit itself.
Height matters because the upslope side of the curb takes the most water. Flashing there must rise above the expected flow, and the lower the pitch, the more the water backs up and the more height you want.
Lay out the skylight around the seams
Standing seam panels run in fixed widths, and the seams stand up like small dams. A skylight placed without regard to them can trap water against a seam and send it sideways into the curb.
Metal Construction News stresses placing penetrations so they do not create a choke point for water flow. In practice, that means:
- Keep clearance between the seam and the side of the skylight. Leave room for water to pass between the nearest seam and the curb instead of pinching into a narrow gap.
- If a seam lands too close to the curb, extend the flashing. Industry practice is to carry the flashing out to the next panel seam so the water path stays open.
- Shift the skylight when you can. Moving a rough opening a few inches to align with panel modules is often cheaper than building oversized flashing. Do it before framing is closed in.
- Draw the panel layout first. Put the seam locations on the framing plan so the carpenter, the roofer and the skylight installer all work to the same lines.
On a retrofit, measure from a known seam, not from a rafter. Panel layout drifts, and a curb centered on the framing may land its edge right on a seam.
When you need a cricket
A wide skylight acts like a wall across the slope. Water that would run straight down now has to go around it, and on a big unit the water piles up on the upslope side.
For penetrations wider than 30 inches, a cricket is typically required to divert water around the obstruction. A cricket is a small peaked, sloped section built behind the curb that splits the flow and sends it to both sides.
For standing seam, plan the cricket as part of the system:
- Frame it with the roof, not as an afterthought.
- Fabricate the cricket flashing from the same metal and gauge as the panels, so it moves and finishes the same way.
- Make sure the water diverted to each side lands in a panel pan with a clear path, not against a seam.
Smaller skylights usually don’t need one, but the upslope flashing still has to be generous.
The flashing layers, from the deck up
A dependable skylight detail works in layers, each one lapping over the one below, the way shingles do. The important point: watertightness comes from how the curb, panel terminations and flashing layers are integrated, not from the skylight unit alone.
Underlayment and deck
Start with a clean, solid deck and a high-temperature underlayment suited to metal roofing. Turn the underlayment up the curb and lap it so water running on the underlayment always drains over the next layer. Use a self-adhered membrane at the curb corners and base, where the detail is most vulnerable.
Panels around the sides and below
Install the panels up each side and below the skylight first, trimming them to the curb. The downslope flashing, or apron, laps over the panels below it and sheds water onto them.
Back pan above the skylight
The upslope side needs a back pan, sometimes called a saddle, that runs under the panels above and over the flanges beside the curb. Panels above the skylight then lap over the back pan, with sealant at the laps as a secondary defense, not the primary one.
What matters is the order of the laps. Water coming down must always flow over the top of the next piece. A common error is setting a skylight on top of the panels and sealing it, without thinking through shingle-lap design and the watershed. That produces back-water laps, which are leaks waiting for a rainstorm.
Sealant: backup only
Sealant has a place, but not as the main barrier. UV and movement degrade it. Skylight manufacturers say the same thing: use flashing systems designed to interlock with the roofing material and direct water away, rather than relying on sealant. Metal roof specialists say it plainly too: sealant can be one line of defense, but good flashing comes first.
Use butyl tape or a high-grade sealant behind laps and at terminations, and design the metal so the joint would still shed water if the sealant failed.
Shed water, but let the panels move
Standing seam panels expand and contract with temperature. A standing seam roof is designed as a floating system, with clips holding the panels while letting them slide. A skylight detail that pins the panel rigidly can fight that movement and tear fasteners or seals over time.
Keep these practices in mind:
- Don’t face-fasten panels to the curb. Let panel ends tuck under or lap over flashing that is fastened to the curb, not to the moving panel.
- Use slotted or hemmed details at the panel edges. Hems stiffen the cut edge and give you a clean line to seal against.
- Place the fasteners in the flashing flange, not through the exposed panel flat, unless the manufacturer’s detail calls for it.
- Keep long panel runs in mind. The longer the panel above the skylight, the more it moves. A long run terminating at a curb needs a detail that tolerates that travel.
- Follow the panel manufacturer’s published details for your profile. A 1" mechanical lock seam and a 1.5" snap lock seam behave and terminate differently.
Some field details cut the panels that run into the skylight deeper than necessary and bend the extra up to form a false rib that helps water shed. It’s a good example of the principle: a formed edge gives you a controlled water line instead of a raw cut edge pressed against sealant.
Check these before you order
Most skylight leaks on metal roofs can be traced to a decision made at the quoting stage. Before ordering materials:
- Pitch. Confirm the roof slope and the panel profile’s minimum slope. Our guide on IBC metal roofing checks down to 1/4:12 covers slope and seam requirements, and low slopes call for taller curbs and more careful cricket design.
- Profile and seam type. Mechanical lock and snap lock panels have different seam heights and different ways of terminating at a curb.
- Skylight model and flashing. Confirm the skylight is suited to a curb-mounted installation on metal and what flashing the manufacturer specifies. Many manufacturers make curb units and flashing intended for metal roofs.
- Curb size and framing. Get the rough opening and finished curb dimensions in writing before panels are cut.
- Warranty and permits. Review the roofing contract and the skylight warranty so everyone knows who is responsible for which part. Manufacturer guidance suggests asking the roofer in writing to coordinate with the skylight installer, and checking local government rules for permits, since a skylight changes the roof structure. Requirements vary by jurisdiction, so confirm with the local building department in your county or city.
- Substrate. If the roof is going over an existing layer, check the code questions for metal over shingles and, for new work, the metal roof deck types that affect slope and run length.
Fabricated flashing beats field bending
Skylight curbs are where field-bent flashing tends to go wrong. Corners are tight, laps are small, and the metal has to be consistent on four sides. Pre-fabricated parts cut to your dimensions take the guesswork out.

The same logic applies to the other detail areas around a skylight installation. See how fabricated curb flashing is specified for standing seam work, how sidewall flashing reduces rework where a roof meets a wall, and how slope transitions can be planned to cut field labor and callbacks.
If the skylight is in a roof that ties into a low-slope membrane area, shop-fabricated transition panels are worth reviewing as well.
Perspective: how we approach skylights on standing seam jobs
We see the same pattern on skylight callbacks. The skylight itself is rarely the problem. The problem is that nobody drew the seams on the plan, the flashing was bent on the roof in bad weather, and the panels were cut to a length that didn’t match what the detail needed.
That’s why we build our process around the contractor. We supply 1" mechanical lock and 1.5" snap lock standing seam panels made on Englert systems in 24-gauge and 26-gauge steel, and we cut them to the lengths your job needs, so the panels stopping at and starting after a curb fit the layout instead of being trimmed down in the field.
We also treat trim and flashing as part of the same package as the panels. When the panels, the back pan, the curb flashing and the closures are ordered together from a takeoff, they arrive matched to one another and to the roof. For tricky roofs, on-site roll forming lets panels be formed at the job, which helps when access or length is a problem.
Our advice to any contractor: lock down the skylight model, curb size and panel layout before the panel order is final. A few minutes with the seam layout on paper saves hours on the roof and a leak complaint later.
Matt Catino
Order the panels and flashing together
We supply roofing contractors, builders and general contractors across Virginia, Maryland, Washington DC, Pennsylvania and West Virginia. For a skylight job, that means cut-and-drop panels cut to length and delivered to the site, plus a trim and flashing package coordinated with the same order.
Send us your plans, panel profile and skylight details, and we’ll help with the takeoff so the pieces around the curb arrive ready to install. Start with our contractor supply page, or look at our standing seam panel options.
A quick install checklist
- Skylight is on a raised curb, at the height the manufacturer and local practice require.
- Seam locations are drawn against the curb, with clear water paths on both sides.
- A cricket is framed behind any skylight wider than 30 inches.
- Underlayment is turned up the curb and lapped in shingle fashion.
- Downslope apron laps over the panels; upslope back pan laps under the panels above.
- Sealant is used as backup at laps, not as the primary barrier.
- Fasteners go through the flashing flange, not through panels that need to move.
- Permit, warranty and coordination between roofer and skylight installer are confirmed in writing.
FAQ
Can you flush-mount a skylight in a standing seam roof?
It’s not recommended. A flush-mounted unit leaves too little flashing height, and home inspector guidance rates flush-mounted skylights as poor and curb-mounted ones as good. A curb gives you the height to build a proper water-shedding detail.
Do I need a cricket for a skylight on a metal roof?
For wide skylights, generally those over 30 inches, yes. The cricket splits the water flowing down the slope and sends it around the curb. Smaller units may not need one, but the upslope flashing still needs to be generous.
What if a panel seam falls right next to the skylight curb?
Don’t leave a narrow gap that traps water. Either shift the skylight so there’s clear space between the seam and the curb, or extend the flashing out to the next seam so water has an open path around the unit.
Is sealant enough to waterproof a skylight on a metal roof?
No. Sealant works as a backup at laps and terminations, but it degrades with UV and movement. The flashing should shed water on its own, with each layer lapped over the one below it.
Who should order the flashing for a skylight on a metal roof?
The roofing contractor usually coordinates it. Order the panels, curb flashing and trim together from the same layout so they match, and confirm in writing who handles which part of the work between the roofer and the skylight installer.
Sources
- Skylights, American Society of Home Inspectors
- Dealing with Metal Roof Penetrations, Metal Construction News
- Skylight Installation Detail, Metal Roof Specialties