Standing Seam Ridge Vent: Choosing and Installing One

How a standing seam ridge vent works, how to size it, check profile compatibility and install it without field-drilling panels. A guide for roofing contractors.
A standing seam ridge vent is a continuous exhaust vent set at the peak of a metal roof. It fills the gap the panel ribs leave at the ridge, lets attic air escape, and blocks rain, snow and insects. The vent must match your panel’s rib profile, be sized against intake at the eaves, and be fastened without drilling through the standing seam itself. Get those three things right and the rest of the install is routine.
This guide is written for roofing contractors, builders and general contractors who order standing seam panels and have to detail the ridge. We cover how the vent works, how to check compatibility, how to calculate ventilation, and the install steps that prevent callbacks.
TL;DR
- A standing seam ridge vent exhausts attic air at the peak. It only works as designed when matched by intake at the soffit or eave.
- Confirm the panel profile, rib height and rib spacing before you order any vent or closure. Do not guess from a photo.
- Size the vent by net free area (NFA) and the attic floor area, using the code ratio your jurisdiction adopts.
- Never field-drill through the standing seam to attach a vent. Use factory-compatible closures and fasten into the decking.
- Order panels, trim, flashing and ridge details together so the ridge is designed before the first panel is cut.
Table of Contents
- What a standing seam ridge vent does
- How the vent keeps weather and pests out
- How to check compatibility with your panel profile
- How much ridge ventilation you need
- Installing a ridge vent on standing seam
- Ordering the ridge with the rest of the roof
- Our perspective
- Get the ridge right from the order
- FAQ
- Sources
What a standing seam ridge vent does
On a shingle roof, a ridge vent is cut into the sheathing at the peak and covered with a cap. A standing seam roof is different. The panels run up the slope, and each rib leaves an open channel under the ridge cap. A standing seam vent from Marco Industries is built for exactly this condition: it fills the gap between the ribs at the ridge while letting air move through along the length of the ridge. The product has a black ribbed body, pre-punched fastener holes and over-stuffed foam that expands to fill the space between the top of the rib and the vent.
The physics is simple. For attic ventilation to work, outside air should enter low at the attic perimeter and exit high near the ridge, according to the U.S. Department of Energy’s Building America guidance. Warm, moist air rises to the peak and leaves through the vent. Replacement air comes in at the soffit or eave. Some designs add an external baffle, which creates suction as wind passes over the ridge and helps exhaust air regardless of wind direction.
Why it matters on a metal roof: the goal is moisture control as much as heat. The same DOE guidance notes that attic ventilation helps control moisture in roof sheathing and structural members and significantly affects a home’s durability. A vented attic under a metal roof that runs cooler and drier is easier to warranty and easier to defend if a homeowner calls.
When a ridge vent is the right choice
A continuous ridge vent suits most gable and hip roofs where there is a clear ridge line and a continuous intake path at the eaves. It gives even exhaust along the whole peak, with no individual penetrations through the panels. Box vents and other static vents can work where a ridge is short, broken by dormers, or where a cut-and-drop panel layout makes ridge exhaust awkward. They add penetrations through flat panel areas, though, and every penetration is a place to flash and seal.
The deciding factors are usually:
- Ridge length relative to attic floor area.
- Whether soffit or eave intake actually exists and is open (blocked soffits are common on remodels).
- Roof geometry: long single ridges favor continuous vents, complex roofs with many short ridges often need a mix of solutions.
- Whether the roof is a vented or unvented (conditioned, spray-foam) assembly. An unvented assembly needs no ridge vent at all.
If an existing roof is not vented to the applicable building code, the DOE guidance recommends engaging a qualified contractor. On new work, the design team or the building department sets the approach, and you build it.
How the vent keeps weather and pests out
The ridge vent has two jobs that pull in opposite directions: pass air and stop everything else. The answer is the closure. Open-cell closure strips, unlike dense closed-cell strips, allow air to pass while acting as a barrier to pests, dirt and moisture, which makes them the right choice for ridge venting. Closed-cell strips seal tightly and are used where you want no air exchange, such as at eaves where the roof is not meant to breathe.
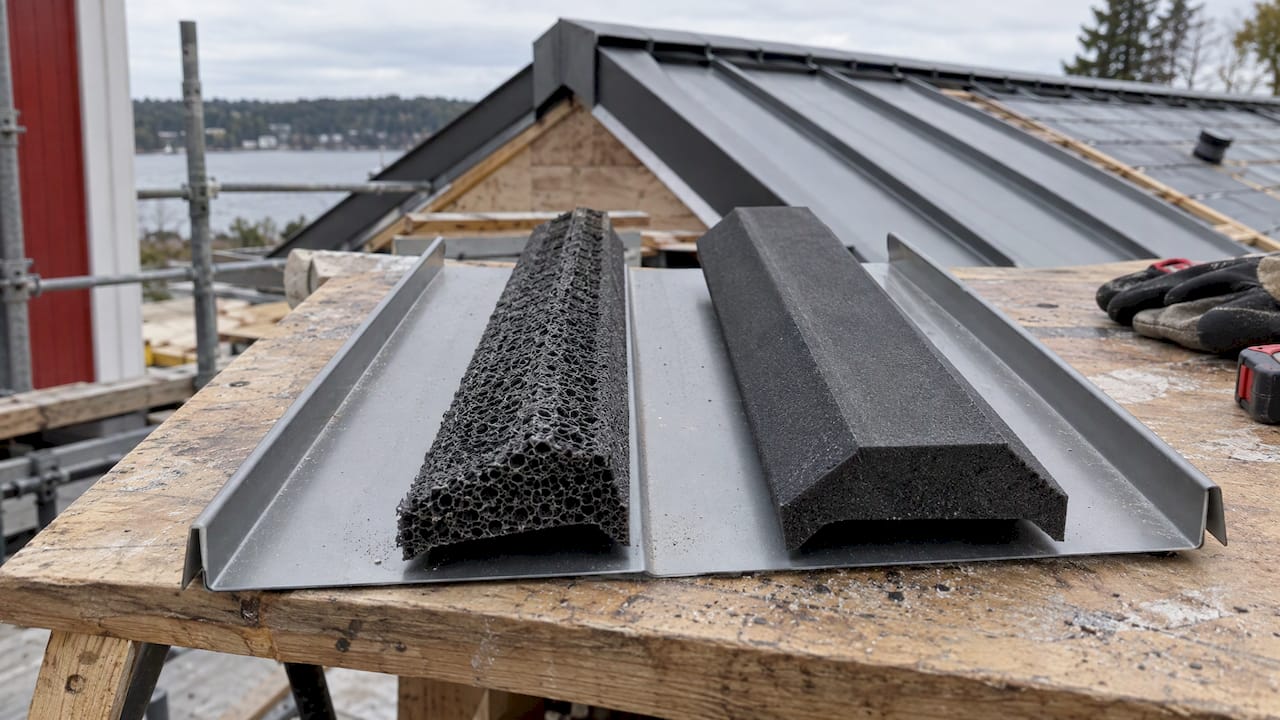
That difference is where installs go wrong. A closed-cell strip dropped under a vent defeats the ventilation. An open-cell strip used where a tight seal is needed invites wind-driven rain. Know which job each closure is doing at each location.
The vent body adds its own defenses: the ribbed profile, the foam that compresses to the rib, and the ridge cap that overhangs the vent opening. Sealant where the vent meets the panel ribs finishes the weather line. Rain should have to travel uphill, against wind, to reach the opening, and that is a function of the cap geometry, not just the foam.
How to check compatibility with your panel profile
This is the question most contractors have and most pages skip. There is no universal standing seam ridge vent. A vent or closure is made for a specific rib height, rib width and seam type. Here is a practical check before you order.
1. Identify the profile and seam type
Standing seam panels fall into two common families: mechanical lock (the seam is field-seamed with a tool, commonly in 1-inch rib heights) and snap lock (the seams engage by pressing together, commonly with a 1.5-inch rib). We supply both, and our panel specs page lists rib dimensions. Whatever your supplier, get the rib height, rib width and seam geometry in writing from the panel manufacturer.
2. Match the vent to the rib
Ridge products are specified by the rib they fit. One vented closure product, for example, is designed around a 1.75-inch rib and a 13.25-inch panel length. A vent made for a 1.75-inch rib will not seal a 1-inch mechanical lock seam, and a vent for a short rib will leave gaps at a taller one. If the rib height or seam shape does not appear on the vent’s spec sheet, ask the vent manufacturer before ordering.
3. Check the substrate and slope
The vent is fastened into the deck. Confirm the deck thickness and type, and whether there is a ridge board or open framing where the vent will sit. Also check the roof pitch: the cap must clear the panels at the actual angle, and the vent length must be compatible with how your panels terminate at the peak.
4. Plan panel length and ridge termination together
Because panels are cut to length, the ridge detail is decided when the order is written. A panel that stops short of the ridge by the wrong distance leaves the vent unsupported, and one that runs too long fights the cap. This is one reason custom-length orders help: you specify the exact length to the ridge setback your vent calls for. Our guide on how long standing seam panels can be covers length limits and handling.
5. Ask for a mockup on the first run
For a large job, build the ridge detail on the first pair of panels before you cut the rest. Check that the closure compresses, the vent sits flat and the cap clears the seams. Ten minutes at the start can save re-cutting an entire order.
How much ridge ventilation you need
Vents are rated by net free area (NFA), the actual open area through which air can move. A manufacturer will state it per linear foot. One standing seam vent lists, for example, 18 square inches of NFA per linear foot. Always use the figure on the spec sheet of the product you are installing, not a generic number.
The code ratio
The model residential code sets a minimum net free ventilating area of 1/150 of the vented space, with an exception allowing 1/300 when specific conditions are met. Those conditions include placing upper ventilators no more than 3 feet below the ridge, putting the balance of the required ventilation in the bottom third of the attic, and, in Climate Zones 6 through 8, using a Class I or II vapor retarder. Local jurisdictions adopt and amend the code, so confirm the ratio with your building department.

A worked example
Take a 1,800-square-foot attic floor.
- At 1/150: 1,800 / 150 = 12 square feet of total NFA, which is 1,728 square inches.
- At 1/300: 1,800 / 300 = 6 square feet, or 864 square inches.
Under the 1/300 exception, the ventilation must be split between high and low. If roughly half is exhaust at the ridge, that is 432 square inches. Divide by a vent rated at 18 square inches per linear foot and you need 24 linear feet of ridge vent. A 40-foot ridge can supply that with room to spare, so the intake becomes the limiting side.
That is the point of the exercise: the ridge is rarely the constraint. Intake is.
Balance matters more than raw area
GAF’s technical bulletin on attic ventilation advises that ridge exhaust should never exceed intake, and warns that unbalanced or mixed systems can cause moisture problems or reverse airflow. In practice that means:
- Do not add a power fan to a roof that already has soffit and ridge vents. The fan can pull air through the ridge instead of the eaves.
- Do not oversize the ridge vent to make up for blocked soffits. Open the intake.
- Check for insulation blocking the eave, and install baffles so the air path is clear from soffit to peak.
Before you cut a ridge vent opening on a remodel, walk the soffits. A beautiful ridge vent on a roof with painted-shut soffit vents is just a hole.
Installing a ridge vent on standing seam
The steps below follow the manufacturer-style sequence for a standing seam vent. Always defer to the instructions for the specific vent and the panel manufacturer. The key steps, as outlined in the Marco installation notes, are:
- Finish the panels first. Set panels and trim to the ridge with the correct setback so the vent has a flat, clean landing.
- Snap a chalk line along the ridge so the vent runs straight. A wandering vent shows from the street.
- Align the vent to the ribs. The foam should meet the top of each rib without being crushed flat or left with daylight.
- Fasten through the pre-punched holes with type 410 fasteners that penetrate at least one-half inch into the decking.
- Seal where the vent meets the panel ribs with a compatible sealant.
- Install the open-hem ridge cap per the steel manufacturer’s instructions.
What not to do
Never field-drill through a standing seam profile to attach a vent. Drilling through the seam breaks the clean, fastener-free weather surface that defines the system, and creates a leak point and a likely warranty argument. Use factory-compatible closures or fasten through the vent’s own flange into the deck.
A few more habits that keep the callbacks away:
- Thermal movement. Metal expands and contracts. Fasten the vent only where it is designed to be fastened, and do not pin the cap rigidly across panel joints.
- Mixed metals. Use fasteners and sealants compatible with the panel finish, to avoid galvanic or staining issues.
- Sealant discipline. Sealant supplements the geometry; it does not replace it. If rain can enter without sealant being present, fix the detail.
- Snow country. In Pennsylvania, West Virginia and the higher elevations of Virginia and Maryland, drifting snow can load the ridge. Confirm the cap profile and consider snow retention and ridge height at design stage.
Ordering the ridge with the rest of the roof
The ridge is a trim detail, and trim is where schedules slip. Coordinating the panels, trim and flashing, and ridge conditions in one takeoff means the crew is not waiting on a missing piece at the peak. If you are ordering custom-length panels cut and dropped at the site, give the ridge setback and vent type on the order so panel lengths land correctly. For long runs or tight access, on-site roll forming lets the crew form panels to the exact length measured at the roof.
To see how the panels look in the field, browse our 24ga mechanical lock project in Washington DC.
Our perspective
We see the same pattern on jobs across Virginia, Maryland, Washington DC, Pennsylvania and West Virginia: the ridge is the last thing anyone designs and the first thing that causes a callback. A crew is ready to set the cap, and someone realizes the vent does not match the rib, or the panels stop an inch short of where the closure needs them.
That is why we push contractors to settle the ridge at the takeoff stage. Our 1-inch mechanical lock and 1.5-inch snap lock panels, made on Englert metal systems in 24-gauge and 26-gauge steel, are cut to the length you specify, so the ridge setback can be built into the order rather than trimmed on a roof. Trim and flashing packages ordered alongside the panels keep the details consistent in finish and fit.
Our advice is simple. Pick the vent before you order panels. Get its rib and seam requirements in writing. Confirm intake at the eaves. Then specify panel lengths to suit. When a roof has an awkward ridge, a long run or limited access, tell our team early so we can plan the delivery and, where it helps, on-site forming, around the real conditions rather than the plan view.
Matt Catino
Get the ridge right from the order
We supply architectural standing seam panels, trim and flashing packages and contractor takeoff support, delivered to the job site across the Mid-Atlantic. If you are pricing a roof and want the panel lengths, trim and ridge details worked out together, start with our contractor supply team and tell us the profile, ridge length and vent you plan to use.
You can also see the full range on our standing seam metal roofing page, or arrange cut-and-drop delivery straight to the site.
FAQ
Can you put a ridge vent on a standing seam metal roof?
Yes. Vents made for standing seam fit over the ribs at the peak and let air out while foam closures block weather and pests. The vent must be matched to the rib height and seam type of your panel, and fastened into the deck rather than through the seams.
How much ridge vent do I need?
It depends on attic floor area, the code ratio your jurisdiction applies (commonly 1/150 or 1/300 of the vented space) and the net free area of the vent you choose. Divide the required exhaust area by the vent’s NFA per linear foot to get the length. Then confirm the intake is at least as large, since exhaust should not exceed it.
Is a ridge vent or a box vent better?
A continuous ridge vent gives even exhaust along a long, unbroken peak and avoids penetrations through the panels. Box vents can suit short or broken ridges, but each one is a penetration to flash. Either way, the system needs open intake at the eaves to work.
Can I drill through the panel to fasten the vent?
No. Do not field-drill through a standing seam profile. Use the vent’s pre-punched flange and fasteners into the decking, with factory-compatible closures and sealant at the ribs.
Does an unvented roof need a ridge vent?
No. In an unvented, conditioned attic assembly the roof is designed without ridge exhaust. Follow the design documents and local code for that assembly, and ask the designer before adding vents.
Sources
- Standing Seam Vent, Marco Industries Technical Library
- Measure Guideline: Guide to Attic Air Sealing, U.S. Department of Energy
- JLC Field Guide: Roof Ventilation
- Closure Strips: Preventing Big Problems, Rollforming Magazine
- Attic Ventilation 101, IIBEC
- TAB-R-120 Proper Attic Ventilation, GAF