Stitch Screw Spacing on Metal Roofs: A Contractor's Guide

How far apart stitch screws go on metal roofing, what sets the spacing, torque values by screw size, and where they fit on standing seam jobs.
There is no single spacing number for stitch screws. The panel manufacturer’s installation instructions and the wind-load design for the project set it. The pattern gets tighter at gable ends, eaves and ridges and looser mid-roof. Torque matters as much as spacing: a stitch screw driven too loose lets water in, and one driven too tight can crack the washer. This guide shows how to read the spacing for your job, drive each screw correctly, and plan fastener counts before panels are ordered.
TL;DR
- A stitch screw ties two overlapping pieces of metal together at a lap. It does not carry the panel to the framing the way a structural fastener does.
- Spacing comes from the manufacturer’s instructions and the project’s wind design, so always get the written pattern before you order fasteners. Edge zones usually get more screws than the field.
- Torque depends on screw size. Published side lap data runs from 42 inch-pounds for #8-18 to 150 inch-pounds for 1/4"-14.
- On standing seam work, stitch screws show up mostly at endlaps, trim and flashing. Panel length, laps and trim packages drive the count.
- Ordering custom-length panels with a matched trim and flashing package makes the fastener count easier to plan.
Table of Contents
- What a stitch screw does
- What sets the spacing
- Where stitch screws go on standing seam jobs
- Where the screw sits in the metal
- Torque and washer compression
- A field routine for each lap
- Planning the fastener count before the order
- Promo
- Perspective
- FAQ
- Sources
What a stitch screw does
A stitch screw, also called a side lap fastener, joins two overlapping pieces of metal. On a through-fastened roof, the laps where adjoining panels meet are secured with a stitch screw that holds the two overlapping pieces together. The same source notes that a roof system’s wind resistance is a factor of the fasteners’ pull-out strength.
The structural fastener does a different job. In exposed-fastener systems it secures the panel to the purlin or deck, while the stitch screw fastens two panels where they overlap. Keep the two apart on the truck and on the roof. A stitch screw is not designed to find framing. It only needs to bite through two layers of sheet metal, so it is typically a shorter screw with a sealing washer.
This is why fastener bins get mixed up on busy jobs. Mark them, and keep structural screws and stitch screws in separate pouches.
What sets the spacing
The ATAS/Metal Construction Association installation manual is direct on this. Fastener spacing varies with geographic and weather conditions, and roofs built for stronger winds get more fasteners installed closer together. The same manual says fasteners along eaves and ridges often differ from those along panel seams, and side seams along gable ends often get more fasteners than mid-roof seams.
In practice five things move the number:
- Panel profile and gauge. A lighter gauge flexes more between fasteners. Gauge also decides which screw size and point style you buy.
- Design wind pressure. Coastal Virginia and Maryland jobs, and tall or exposed buildings, carry higher design pressures than a sheltered inland house.
- Roof zone. Corners, rakes, eaves and ridges see the highest uplift, so they get tighter patterns than the field.
- Framing spacing. Purlin or deck support changes how much load each fastener sees. Our purlin spacing checklist covers that side of the question.
- The manufacturer’s tested assembly. The tested pattern is the one the warranty and the engineering rest on.
The manual also tells installers to follow the manufacturer’s instructions on the type, spacing and location of every fastener, because spacing and fastener types change within the roof itself as stress changes. That is the rule to hold a crew to. A forum answer of “every 12 inches, that’s what I do” is a habit, not a design.
A worked example of how wind design changes the count
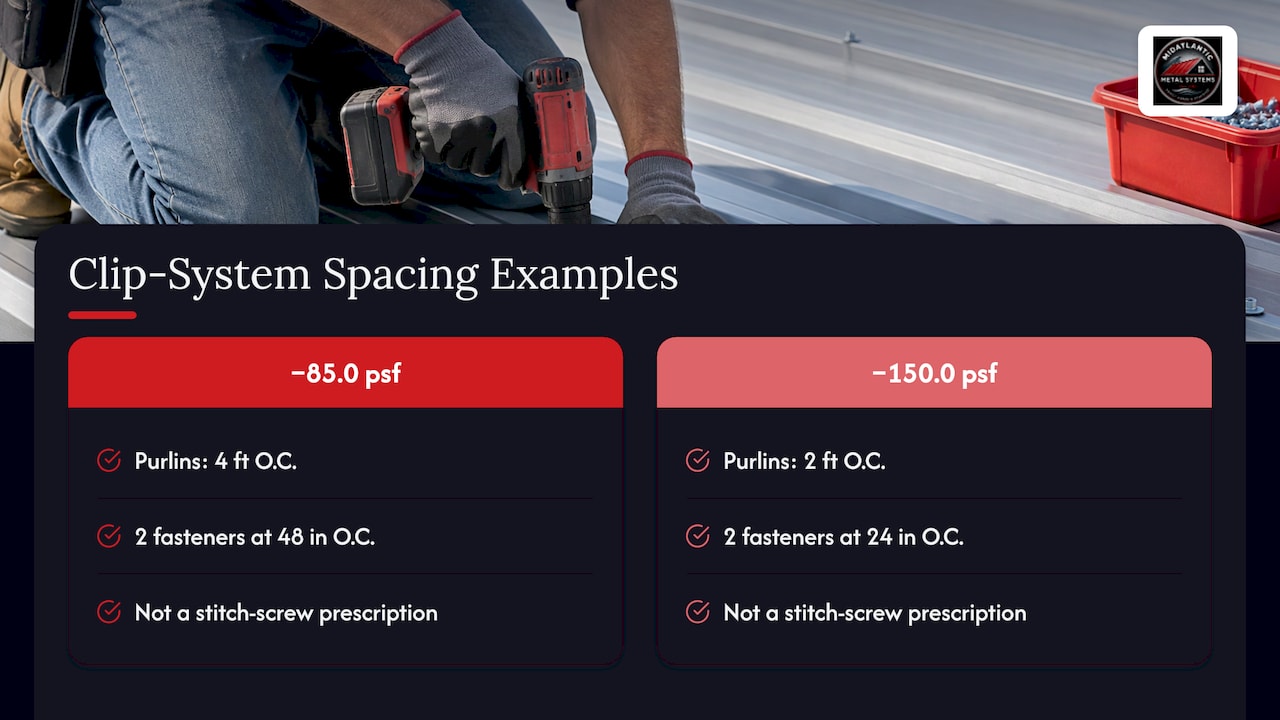
Evaluation reports show how sharply the pattern moves with design pressure. This one is for a standing seam clip system, not stitch screws, but it shows the logic every pattern follows. In one evaluation effective November 1, 2017, a design wind pressure of -85.0 psf with 16-gauge purlins at 4’-0" on center called for two fasteners at 48" on center, while -150.0 psf with purlins at 2’-0" on center called for two fasteners at 24" on center. Higher uplift, closer support, closer fasteners. The same thinking applies when you read a stitch screw schedule: the tighter rows go where the pressure is highest.
For clip spacing on long panels, see our note on standing seam clip spacing for panels over 10 ft.
Where stitch screws go on standing seam jobs
A standing seam roof is a concealed-fastener system. Panels attach with clips under the seam, and the seam itself is mechanically locked or snapped together, so a field of standing seam panels does not need a row of stitch screws up every seam the way a corrugated or R-panel roof does. Stitch screws come in at the places where metal overlaps metal and a seam cannot do the work:
- Panel endlaps. When a run is too long for one panel, the upper panel laps over the lower. Our guide to standing seam panel endlap details explains when an endlap is the right call.
- Trim and flashing laps. Rake, eave, ridge and valley pieces overlap each other and the panel. Stitch screws secure those laps.
- Closures and transitions. Where a panel meets a wall, curb or penetration flashing, the flashing laps are stitched.
Because screws at these spots are exposed, treat them as potential leak points. Space them per the manufacturer’s trim detail, set them in the flat of the metal, and seal the laps as the instructions require.
One way to reduce the number of endlaps is to avoid them in the first place. Panels cut to the full rake length from eave to ridge need no endlap and no endlap fasteners. See how long standing seam panels can be for the practical limits on length and handling.
Where the screw sits in the metal
On exposed-fastener panels, placement within the profile matters as much as spacing. The structural fastener commonly sits in the flat of the panel next to the major rib. The same article warns that, unless the panel has been tested for it, you should not fasten through the high rib. There is no backing to support the screw, uplift and gravity loads are undefined, and the washer cannot compress and seal without support.
For trim, the same principle applies. Drive screws where two flat surfaces are pressed together, never across a hem or bend where the washer cannot sit flat.
Torque and washer compression
The screw is only as good as its seat. Fasteners installed in the flat of the metal at proper sealing washer depth give the best protection against leaks. Fasteners that are too loose allow water entry. Fasteners that are too tight can compress the washer until it cracks, splits and erodes quickly.
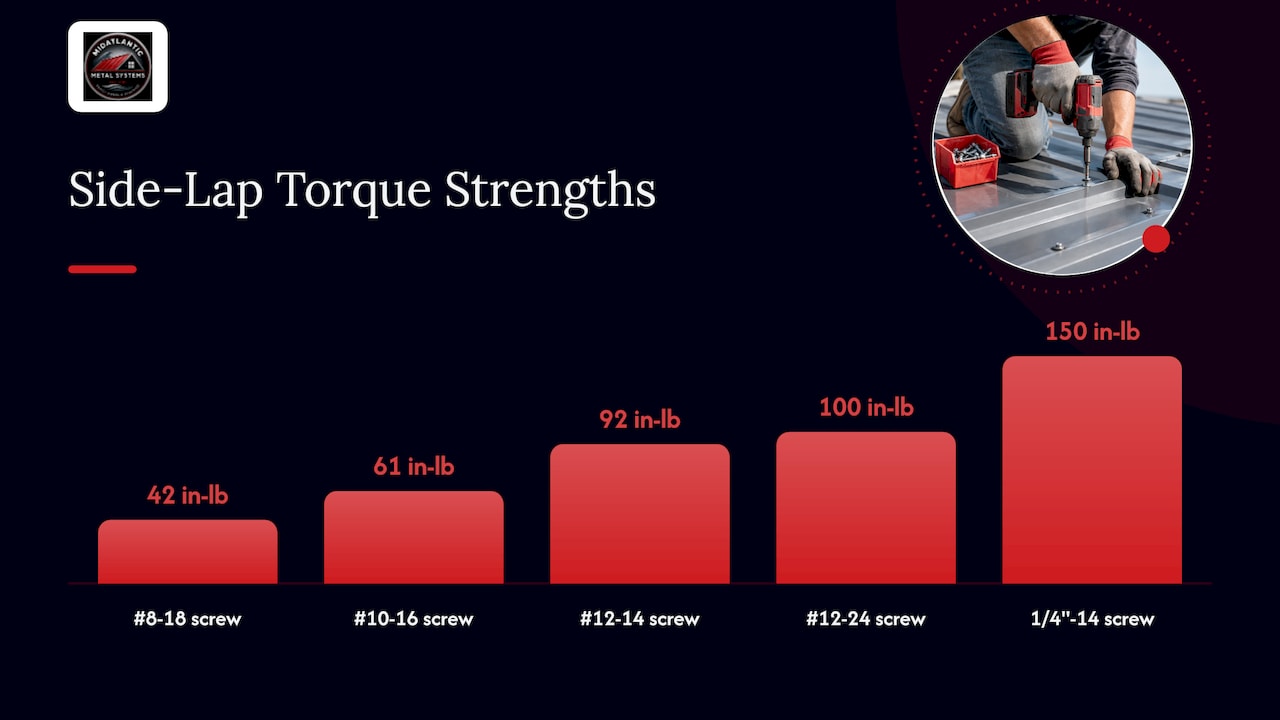
Side lap torque data from a fastener manufacturer shows how much the rating changes by size (Cordova Bolt’s published torque strengths):
| Side lap fastener | Torque strength |
|---|---|
| #8-18 | 42 inch-pounds |
| #10-16 | 61 inch-pounds |
| #12-14 | 92 inch-pounds |
| #12-24 | 100 inch-pounds |
| 1/4"-14 | 150 inch-pounds |
Those figures are the strength of the screw, not a setting for your driver. Use them to understand the ceiling. Your working target is washer compression: the rubber seated snug and slightly bulged evenly around the head, not squeezed out or split.
For the same source’s size guidance, the 1/4"-14 x 7/8" side lap fastener is listed for 22, 24, 26 and 29 gauge panels. The 12-14 x 3/4" sharp point is listed for 26 and 29 gauge, and the 12-14 x 3/4" #1 for 16 to 20 gauge. On a 24-gauge or 26-gauge standing seam job, match the screw to the trim and panel gauge in the manufacturer’s instructions.
Driver habits that protect the washer
- Use a variable-speed screw gun with a depth-sensing nose or clutch. A standard drill with no clutch will overdrive screws.
- Hold the gun square to the surface. An angled screw crushes one side of the washer and leaves the other open.
- Keep a magnetic bit and swap out worn bits. A cammed-out bit leads to over-turning.
- Check a sample of screws after the first run of trim. If washers are mushrooming or splitting, adjust the clutch before going further.
- Pull and replace any screw that strips. Do not leave it and add one beside it unless the manufacturer’s detail allows.
A field routine for each lap
- Get the written pattern. Ask the panel and trim supplier for the fastener schedule that applies to your panel, gauge and wind zone. Use the project’s engineered wind design where there is one.
- Separate the zones. Mark corners, rakes, eaves and ridge on the plan. Those get the tighter pattern.
- Dry-fit the lap. Align trim and panel, check the overlap, and clamp or hold it so it cannot shift while the screws go in.
- Set a layout line. Snap or mark screw positions so spacing is even. A crew that eyeballs spacing drifts, and drift shows on a long ridge.
- Drive in the flat. Keep screws off ribs and bends.
- Check washers. Snug and even, not split.
- Count and reconcile. Compare fasteners used against the takeoff. A big shortfall or overage usually means a zone was missed or a pattern was changed on the fly.
Planning the fastener count before the order
Stitch screw counts come from linear feet of lap, divided by spacing, plus the zone adjustments. On a simple gable, the endlaps and trim are the bulk of it. On a complex roof with hips, valleys and penetrations, trim laps multiply fast.
Getting that count wrong costs a second supply run in the middle of a dry-in. A roofing bid software workflow that ties takeoff to vendor quotes helps keep fastener quantities in the estimate rather than guessed at the end. Whatever tool you use, carry one line for stitch screws by zone, with a small overage for stripped or dropped screws.
A few planning habits help:
- Count laps from the trim drawing, not from a rule of thumb per square.
- Add trim lengths and laps together, since each lap needs its own run of screws.
- Buy fasteners to match the panel finish where exposed heads will show.
- Confirm the screw size for the gauge you are using.
Promo
We supply custom-length architectural standing seam panels in 1-inch mechanical lock and 1.5-inch snap lock profiles, in 24-gauge and 26-gauge Englert steel, along with trim and flashing packages, fasteners and accessories, and takeoff support for contractors in Virginia, Maryland, Washington DC, Pennsylvania and West Virginia. Panels come cut to length and dropped at the job site through our cut-and-drop delivery, and portable on-site roll forming is available for challenging projects. Cutting panels to length helps reduce endlaps, so there are fewer laps to stitch. Send your plans to our contractor supply team to get a panel, trim and fastener list together.
Browse the full range on our standing seam metal roofing page.
Perspective
Most callbacks on metal roofs trace back to small things: a screw in the wrong place, a washer crushed on a cold morning, a trim lap that was eyeballed. Stitch screws are cheap, so crews treat them as an afterthought. They are the part of the roof a homeowner can see from the driveway.
Our view is simple. Reduce the number of laps you have to make, then make each one right. That is why we build our business around custom-length panels delivered to the job site. When panels run eave to ridge, the endlap and its fasteners disappear. When trim and flashing arrive as a coordinated package, the laps are planned instead of improvised.
We also like to see fastener schedules settled before material is ordered, not on the roof. Zone by zone, screw by screw, tied to the manufacturer’s instructions and the project’s wind design. Our team supports contractors with takeoffs so the panels, trim and fasteners show up together and the crew can keep moving.
Matt Catino
FAQ
How far apart should stitch screws be on metal roofing?
The spacing is set by the panel manufacturer’s instructions and the project’s wind design, not by a universal number. Tighter patterns go at gable ends, eaves and ridges, and wider ones in the field. Get the written fastener schedule for your panel and gauge before you order.
What torque should I use on stitch screws?
Torque strength rises with screw size, from 42 inch-pounds for a #8-18 to 150 inch-pounds for a 1/4"-14, per published side lap data. In the field, set the clutch so the sealing washer seats snug and even, without splitting or squeezing out. Test on scrap first and recheck after the first run of trim.
Do standing seam panels need stitch screws?
Standing seam panels attach with clips and locked seams, so the field of the roof does not need a stitch screw up each seam. Stitch screws are used where metal laps metal without a seam, such as endlaps and trim or flashing laps. Follow the manufacturer’s detail for each.
Do stitch screws go in the rib or the flat?
In the flat of the metal. Fastening through a high rib leaves the screw unsupported and the washer unable to seal, unless the panel has been tested for it. Keep screws off ribs and bends.
How do I reduce the number of stitch screws on a job?
Reduce laps. Ordering panels cut to the full run length removes endlaps, and a coordinated trim package keeps the remaining laps planned. Fewer laps means fewer exposed fasteners and fewer places for leaks.
Sources
- Metal Building Fasteners, Cordova Bolt, Inc.
- Making The Case For Using 26-Gauge Steel For Residential Roofs, Design and Build with Metal
- Installing Exposed Fastener Metal Roofs, Metal Roofing Magazine
- Metal Roof Installation Manual, ATAS/Metal Construction Association
- Cee-Lock Standing Seam Metal Roof Panels evaluation (rc203), Berridge